Layered Materials - Vertex Color Manager in Maya
Intro
In modern development layered materials are all the rage. One of the cheaper ways to denote where to assign materials is vertex color, and in this post we will explore a dynamic solution for accurately setting and managing those vertex colors in Maya. Using this system artists can avoid manually entering values, and simply assign predetermined values to their selection. This reduces the tedium of assigning tightly assigned values within the same channel, which allows for a much more nuanced control over the vertex color without artist having to remember specific values or formulas. Additionally this reduces human error by reducing the necessary detailed knowledge artists are required to remember. As long as they know what vertex color channel, and what layer they wish to assign their selection to, they can continue mistake free.
Overview
As a quick overview of the end result and example of the user experience using this tool, first we'll go over the finalized UI, and then a quick demo of the tool in action.
The UI
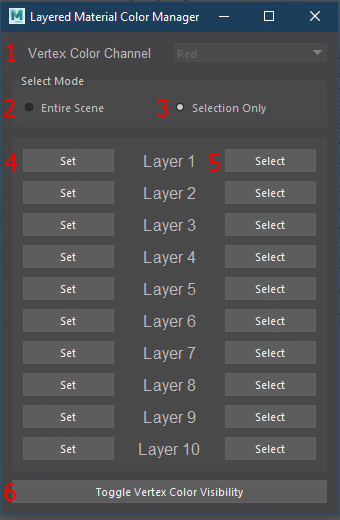
- Vertex Color Channel - This is where users can select what channel they wish to be applying values to. At the time of writing this, we are only using the Red channel, but the tool inherently supports all channels. In this case disabling the selection reduces human error, but the functionality remains in the backend.
- Select Mode: Entire Scene - When selected, pressing any of the Select buttons will select all faces in the scene with the corresponding layer value applied to them, as well as affects what objects will be affected when toggling vertex color visibility.
- Select Mode: Selection Only - When selected, pressing any of the Select buttons will select only faces on the selected object with the corresponding layer value applied to them, as well as affects what objects will be affected when toggling vertex color visibility
- Set - Sets the corresponding layer value to the selected faces or objects.
- Select - Selects the faces with the corresponding layer value applied, based on the select mode.
- Toggle Vertex Color Visibility - Toggles vertex color visualization based on the corresponding select mode value. This is effectively the same as Mesh Display > Toggle Display Colors Attribute.
The Demo
In the GIF above we see a down-and-dirty example of the color manager in action to illustrate a basic example of the color manager in a basic workflow. With the select mode "Entire Scene" selected, we first toggle on Vertex Color visibility. Since no vertex color has been set on these brand-new primatives, nothing changes. Next we select the cube at the object level, and set the entirety of this object to Layer 1. Following that, we select the torus, and switch to face mode. We then make a selection of faces, and set those to Layer 1 as well, and then we make another selection of faces and set those to Layer 4. Finally, with the select mode "Entire Scene" still selected, we select all of the faces which have Layer 1 assigned.
The example is fast and the art is boring, but I think the value speaks for itself. Managing vertex colors, especially when they are split, involves a lot of number-entering and menu navigation for artists. Using this tool reduces the artists effort substantially by providing an intuitive, responsive, and concise platform in which to set vertex colors.
The Breakdown
In an effort to keep this from becoming a line-by-line breakdown, we will be focusing on a few key, unique elements of this tool. In an effort to provide guidance to other artists, I will call out anything relevant along the way, but if you have any additional questions that are not answered here please feel free to drop me a line!
Interpreting The Ask
First and foremost in the creation of any tool, is the problem we are trying to solve. In this circumstance, I was asked to provide a way for artists to quickly and efficiently set, select, and visualize vertex color in the Red channel to a specific value based on a set number of layers.
In my interpretation of this request, I saw a few key points to hit.
- Visualization was paramount - there is no way anyone is going to remember what each face is set to on a real asset otherwise. Fortunately for us, this is default behavior in Maya and we simply need to expose it by calling: mel.eval('ToggleDisplayColorsAttr;') on whatever selection we pass.
- The number of layers needed to remain dynamic. You never know when artists will request more layers, or when you will have to tell artists to remove some layers to meet performance goals. Furthermore, while we had a set number for the red channel at that time, all of the other vertex color channels were open canvases waiting for their own standards, so to avoid rewriting the UI on a per-channel basis, dynamic layer options were crucial.
- While the ask only requested the tool be viable for the Red channel, the ability to change channels and provide an easy-to-expand platform was crucial to provide an easily expandable platform.
With these key values identified, we can move on to the fun parts of the tool.
Dynamic Layer Option Population
One of the more interesting parts of this idea is populating the UI dynamically, based on a defined standard. The simplest solution I found was to create a source of truth by using either a JSON file, or a dictionary, which can be edited by the appropriate content owners to set their standards. We then parse this dictionary for each color, and then populate the UI based on the returned list of layers. While this introduces a point of human error, it also introduces a way to dynamically label the layers which can be useful for artists if the standards are strict (ie: if "Layer 1" is always metal, then there is no reason it cannot be labeled as "Metal").
Below we can see an example formatting of a JSON file for use with this tool, though if desired this can easily be transferred to a standard dictionary.
The first thing we do with this information is populate the Vertex Color Channel combo box. By doing this dynamically, we can simply call the "Supported_Colors" keys, and add the available items to our combo box. If we wish to omit a channel from selection, we can either simply not include that channel in our supported colors, or alternatively add a check to ensure the values for each key are not "None" before adding them.
To cleanly handle the dynamically changing widgets, I really like to toss them all into a convenient groupbox first. From there, we simply enumerate over the values for the selected color and create the requisite widgets. Using this same enumeration, we will also provide the vertex color value for each button in a lambda function. This method allows us to iterate over each provided value, creating our UI dynamically based on the predetermined values.
Below we can see the full function for dynamically creating the UI based on our input. This function will run every time we change the selected Vertex Color Channel.
The more interesting parts of the above code are here:
- Line 13 we divide the current index by the length of the provided values. This gives us our vertex color value, but in uneven cases will give us a long float, so we truncate this float to the 10th position for simplicitys sake in line 14.
- In Line 22 and Line 36 we connect our dynamically created "Set" and "Select" buttons respectively. To create these buttons dynamically we need to ensure we are not overwriting the same button(s) each time we iterate over the UI generation. To do so we use a lambda function.
- When setting the color values in Line 22 we are referencing an external script which contains much of the core functionality for this tool. LM_Core.set_vertex_color is an extremely simple function which first parses the input color, then runs pymel.polyColorPerVertex on the selected channel, with the selected value.
Resetting the Layout on Channel Selection
Since we potentialy need to adjust our UI on a per-channel basis, we need a simple way to remove all the elements from our layer groupbox. The following solution is run immediately after users select a different vertex color channel, just before repopulating the groupbox with it's new children.
The above code is really simple, but allows us to quickly remove our UI elements in preparation for our updated layout.